![How-to properly configure Google Analytics Property settings [Step 1 of 4]](https://mashmetrics.com/wp-content/uploads/2019/12/How-to-configure-google-Analytics-Part-1-of-4.png)
Before we get started
One of the most common questions Google Analytics consultants get asked is: “Can you install or configure Google Analytics [Google Tag Manager, Google Ads, Google Search Console, Google Marketing Platform]?”.
Most of the time what you would REALLY want is:
Accurate, Actionable and Accessible Analytics from Google (and your other marketing analytics).
At MashMetrics we call this “AAA Analytics”
Setting up a Google Analytics account so that it produces reliable data that is also actionable requires a series of customizations rather than just using it out of the box. That being said, we would all rather get right to the insights.
In order to assure an AAA implementation for every client regardless of size (at scale):
- We created a series of checklists
- We created a comprehensive Google Tag Manager container to speed up implementation while still offering the latest best-in-class features
- We automated quite a bit with Analytics-Toolkit
- To put a ring on it we created a Google Data Studio MashBoard to show it all off in an easy to use manner
When installing Google Analytics, Google Tag Manager or any analytics tool it is critical to configure the tool to meet your business objectives. These steps will get you 90% there!
Free Download
We are going to assume that you already have a Google Analytics property collecting data. You may be anxious to clean it up and take advantage of the more enhanced features mentioned in this post, however, calm yourself young jedi.
The first step in AAA data adoption is trust in the data. If you are constantly making excuses why the data is messed up or even worse get surprised when someone else calls out your mistakes you are climbing an uphill battle.
So before making these or other changes to your analytics these instructions start with creating a TEST property, and we recommend you start there as well.
If you don’t have Edit permission on the account, you won’t be able to click the +Create Property option. Pass the following Google Analytics Edit Rights guide on to your Administrator. (Substitute with your own Google Account used.)
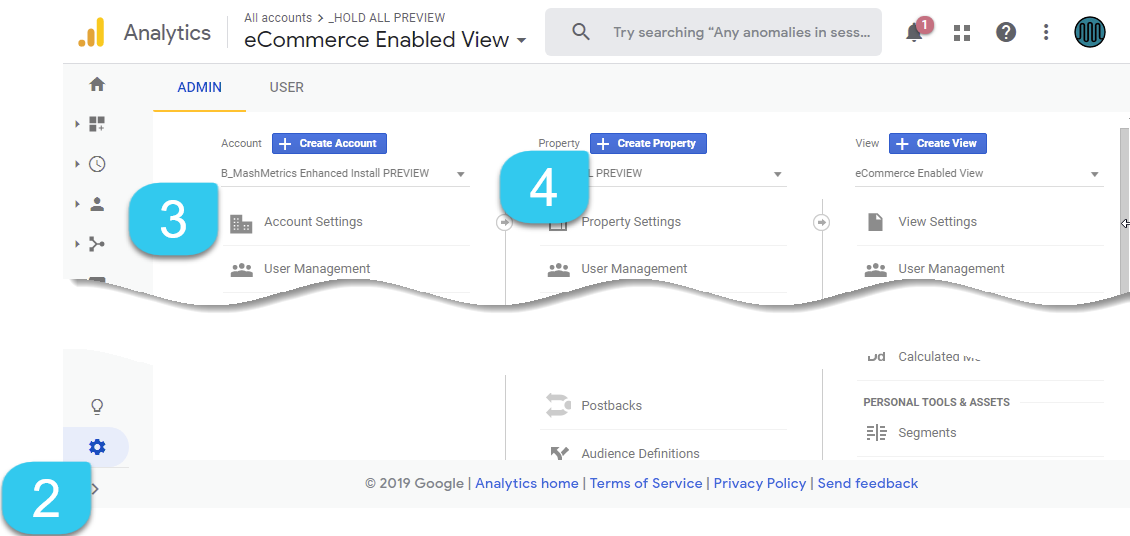
- Sign in to Google Analytics (GA)..
- Click Admin.
- In the ACCOUNT column, use the menu to select the account to which you want to add the property. If you are an agency and have a lot of accounts, use the search box to help you find the right one.*
- In the PROPERTY column, select +Create Property from the menu.
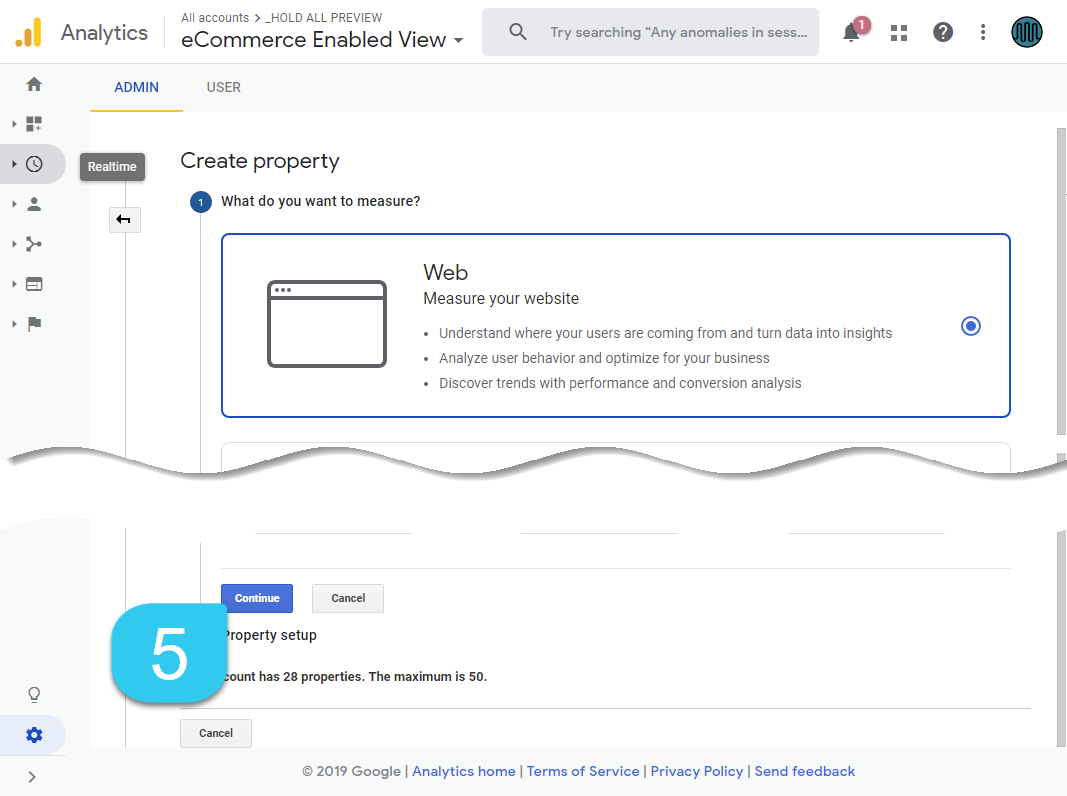
- Select Web and press Continue
- [These instructions will be updated with the new Mobile + App property settings shortly].
- Enter “TEST – Your Website URL” within the Website Name textbox.
- Enter the Website URL used above in the textbox of the same name.
You cannot create a property if your URL isn’t formatted correctly. xyz.tld or subdomain.zyx.tld - Select an Industry Category to be used for baselines in a few reports
- Select the Reporting Time Zone
The time zone setting affects how data appears in your reports. For example, if you choose United States, Pacific Time, then the beginning and end of each day is calculated based on Pacific Time, regardless of whether the sessions are detected from New York, London, or Moscow.The MashMetrics GTM Container explained below contains a Custom Dimension that collects the actual time a user hits your website. This allows for a realistic analysis of “morning, lunchtime, evening, nightime) analysis across the world. - Finally, click Create. Write down your newly assigned Tracking ID (ex. UA-12345-1) for easy access when setting up Google Tag Manager (GTM).

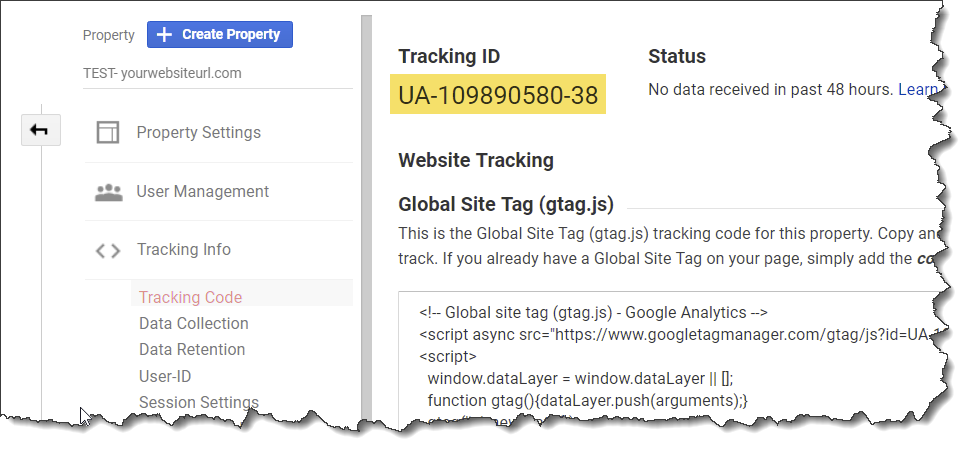
Congrats, you have now created a new Google Analytics property. Don’t get too excited, it will not start collecting data until the completion of Step 3 below. In order to collect clean data from the start, let’s go ahead and continue the setup process by configuring some of Google Analytics more advanced settings.
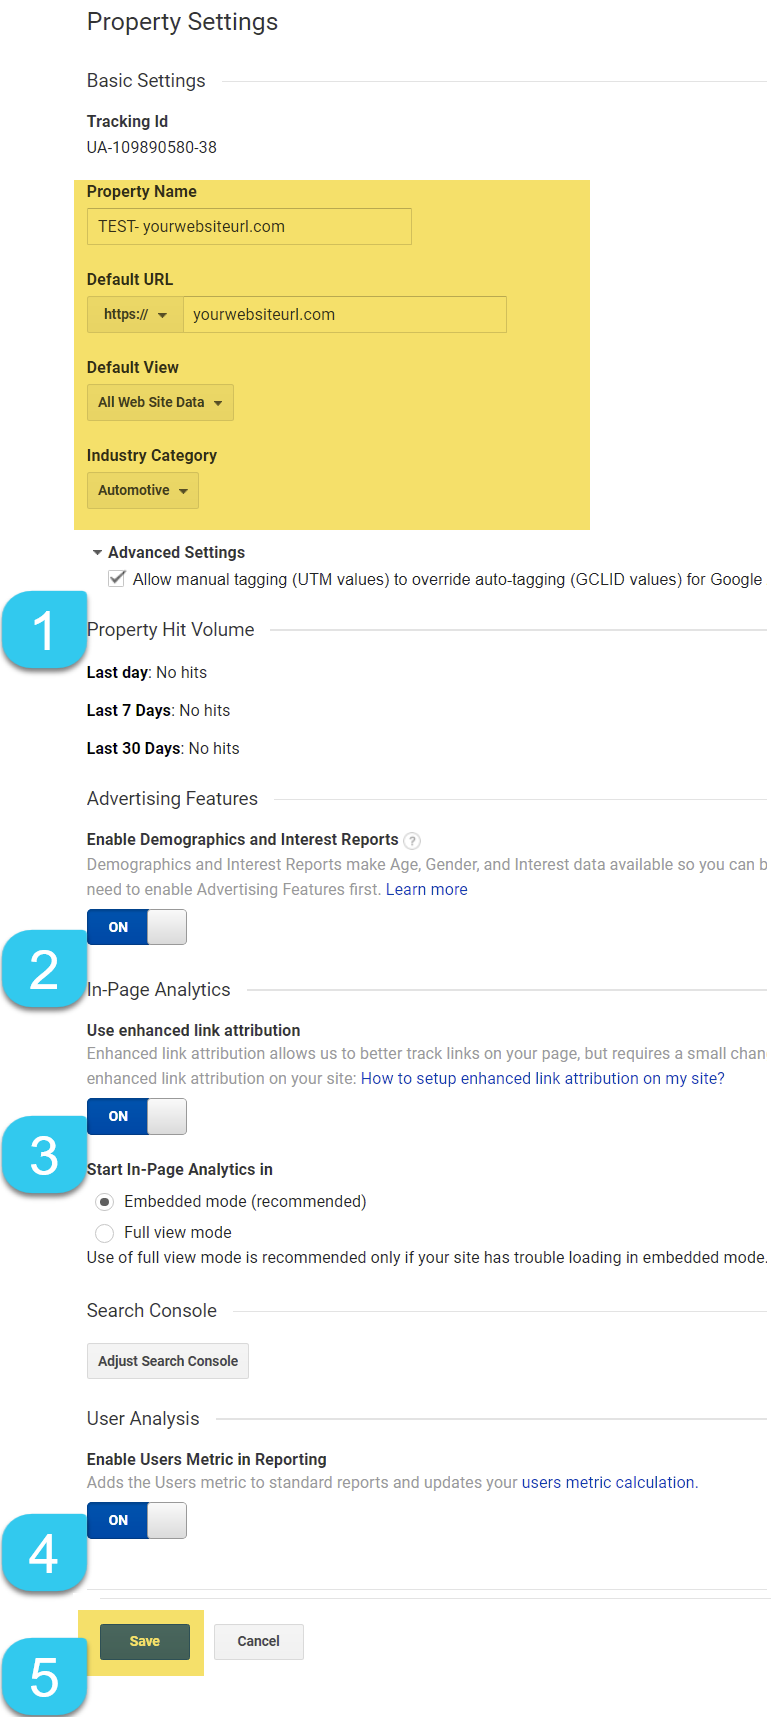
1.b General Property Settings
Once your Google Analytics property is created, let’s now go back to the “Property Settings” at the top of the Property column still within the Admin area. You were likely taken to the Tracking Code section after completing the steps above, so simply go to the top of this column. We will now complete the page with more refined configuration settings.
- Scroll past what you have already filled out and under Advanced Settings “Allow manual tagging to overide…”
Enabling this feature will assure your marketing team has the best of both worlds: Utilize Google Ads auto-tagging for quick and efficient launches and when the need arises you can add more detailed utm_content, utm_term, or even custom utm_campaign and mediums - Assure Enable Demographics and Interest Reports is turned ON
Considering this is a TEST property, you may want to simply assure this is enabled on your current Property. The data relies upon your cookie pool of users and even though you may just now be enabling this, it can take advantage of past user data collection.This will enable such dimensions as Age, Gender, General Interests and more. European and other areas may want to check their Privacy Policy when enabling this. For those that are under GDPR juristdiction please read our post on the topic before enabling this setting. - Toggle enchanced link attribution ON.
While the Google Analytics When performing more advanced analysis this will help measure click-through of unique buttons that link to the same destination. In order to access this data, you will need to enable a Chrome browser extension called In-Page Analytics. - Considering this is a TEST property we will not setup the Google Search Console, but this is highly recommended to do in your historical Property.
- By default the User Metric is enabled, you will want to keep it this way.
- Click Save to continue on to configure advanced settings that make your data much more actionable!
1.c Activating Signals (Enhanced user data)
While you enabled Demographic and Interst settings above there is even more actionable information we can add to the mix. Signals” utilizes Google’s vast pool of user-based demographic, interest and device usage. While the data is heavily anonomyized and aggregated, and there are limitations on the reports the data can be included in, Signals can provide valuable information about your online audience.
If you have brick-and-morter locations such as retail storefronts, regional offices, or a single or multiple restaurants this setting is a MUST. This also utilizes Google’s cookie pool of your users to also provide more accurate cross-device and even in-store visit data.
NOTE: As with the Demographic and Interest settings above, please review this information with your legal team to assure it is mentioned within your user privacy statement.
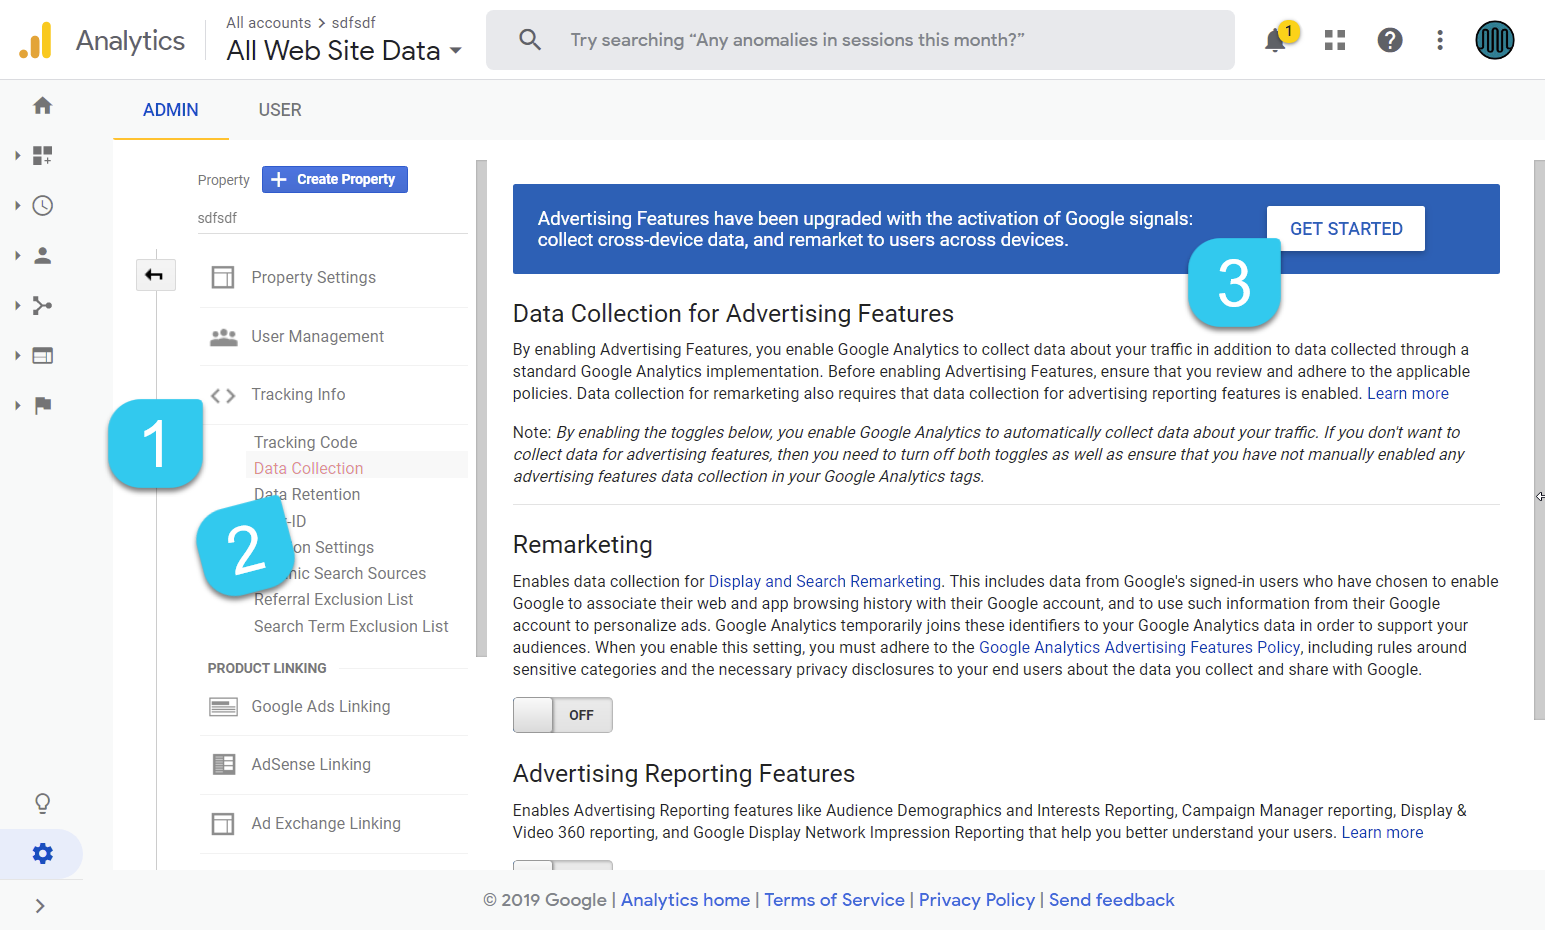
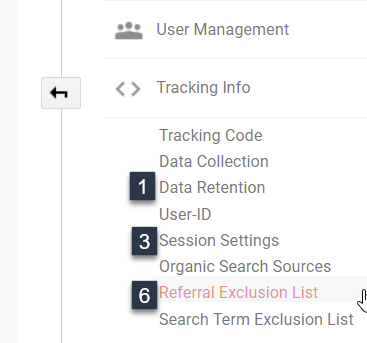
- Navigate to the Tracking Info area under Property Settings
- More choices will appear, Click on Data Collection
- Click the Get Started button at the top within the blue banner to setup Signals data collection.
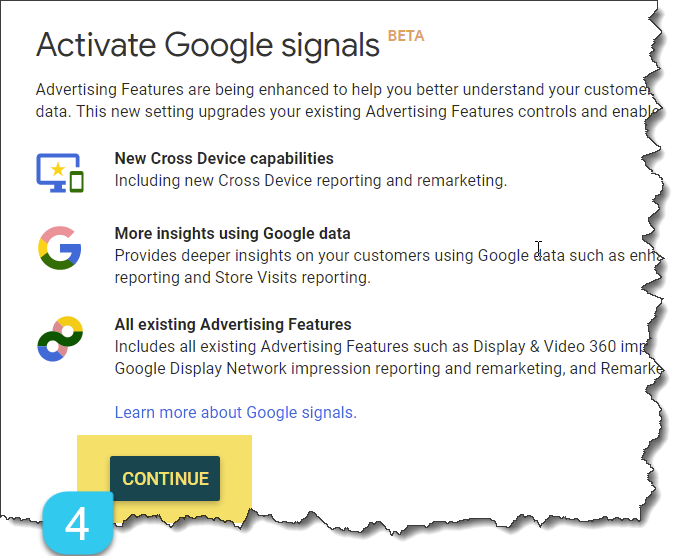
- Press Continue to Activate Google Signals after reading about the benefits
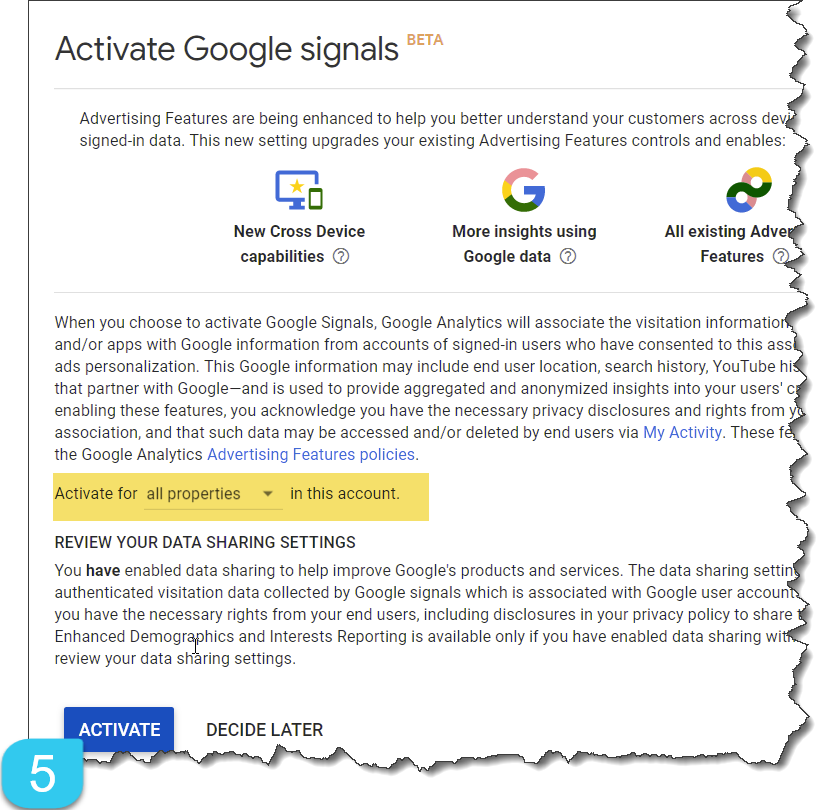
- By default Signals will then be enabled within all the properties in your Account which is our reccomendation. However, if you would like to enable these features only in this Test Property set accordingly. Click Activate.
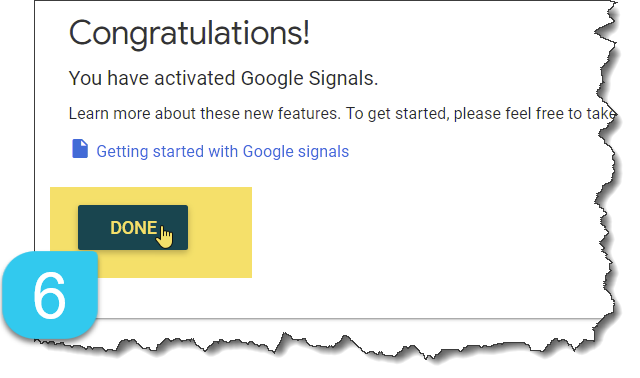
- You are Done. Click Done.
This area also controls how Google attributes your marketing data, how long it stores user-based information and session time limit configuration. The default Google Analytics settings are heavily biased against top and middle funnel advertising, as expected from the source, they want to show as much PPC as possible.
Our customized settings below have been proven to better report the effect your marketing efforts and overall site behavior have across channels and devices. Through implementation,testing, and analysis of over 300 publisher, lead generation, support and eCommerce websites MashMetrics has come to the below best practices. Note, a solid marketing campaign tracking strategy (UTM) and correctly setup Cross-Domain settings are necessary to take full advantage of these features.
We will be changing the three areas noted below.
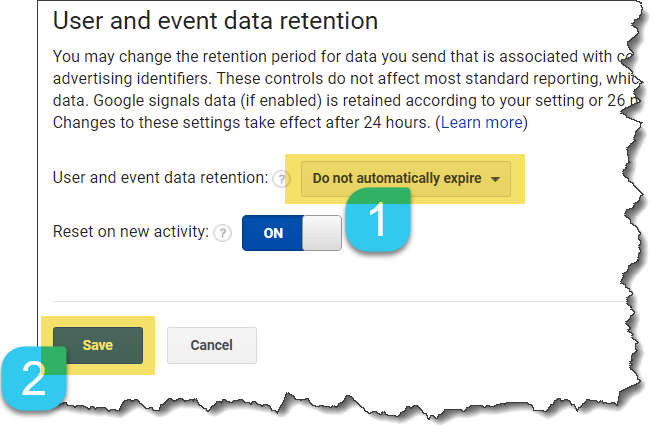
- Within Data Retention select 50 months (recommended) or Do not automatically expire and assure Reset on new activity is ON
This is referred to as the retention period. For GDPR and other privacy laws a data retention policy must be defined and stated upon your website. This assures you can not keep user data forever. NOTE: Aggregated data such as total sessions, pages, etc. will never be removed. - Click Save
- Within Session Settings expand the Session timeout to 2 Hours and 30 Minutes
While 30 minutes was a decent amount of time many years ago, users open up many windows at one time and have much longer surfing sessions. - Within Campaign timeout to 3 Month
While benefiting bottom-funnel channels such as Display or Paid Search, giving credit to a marketing channel used 6 months ago seems excessive. We recommend 3 Months. This will also align more accurately with Facebook, Google Ads and other marketing channel reports. Along with this recommdation, make sure you start to analyze your channel reporting by New vs Return Visitors. - Click Apply
- If your website leaps into another domain (known as cross-domain tracking) other than the one listed you will want to list the websites here. This will correspond with the instructions later to setup Cross-Domain tracking. (This step gets to be a little more advanced. If your users jump from various domains to purchase products, register for events and more we recommend you give us a jingle.
- Click the Get Started button at the top within the blue banner to setup Signals data collection.

I know you are excited to start seeing data so let’s get on with it. Instead of installing Google Analytics on your pages and needing to call CodeBusters to keep making small changes to your website we are going to use Google Tag Manager. Go to Step 2
Was this article helpful to you?
Keep an eye on the MashMetrics blog for more topics like these or follow us on Linkedin and Twitter!
3 Comments. Leave new
[…] Enter the Google Analytics UA number you wrote down (or copied) after completing Step 1a […]
[…] settings are changed, Property settings and View Settings. These are often confused. Property settings, as we setup first, allow you to integrate Google Products, change session and campaign duration, and set privacy […]
[…] You may also be interested in our detailed post on the pros, cons and success tips of dashboards, performance alerts and custom reporting. Some of the reports surrounding events and goals utilize the MashMetrics Google Analytics Framework. […]